Tuesday 27 February 2018

Restoring an Edwardian cast iron fireplace

The day we moved in, we found an intriguing boxed in area on the master bedroom chimney breast, which had been hidden behind a headboard when we viewed the house. Ryan suggested we focus on unpacking first, but curiosity soon got the better of me, so I snuck upstairs and levered off the board.


 I was really hoping to find an original fireplace, but I wasn't expecting it to be painted bright pink!


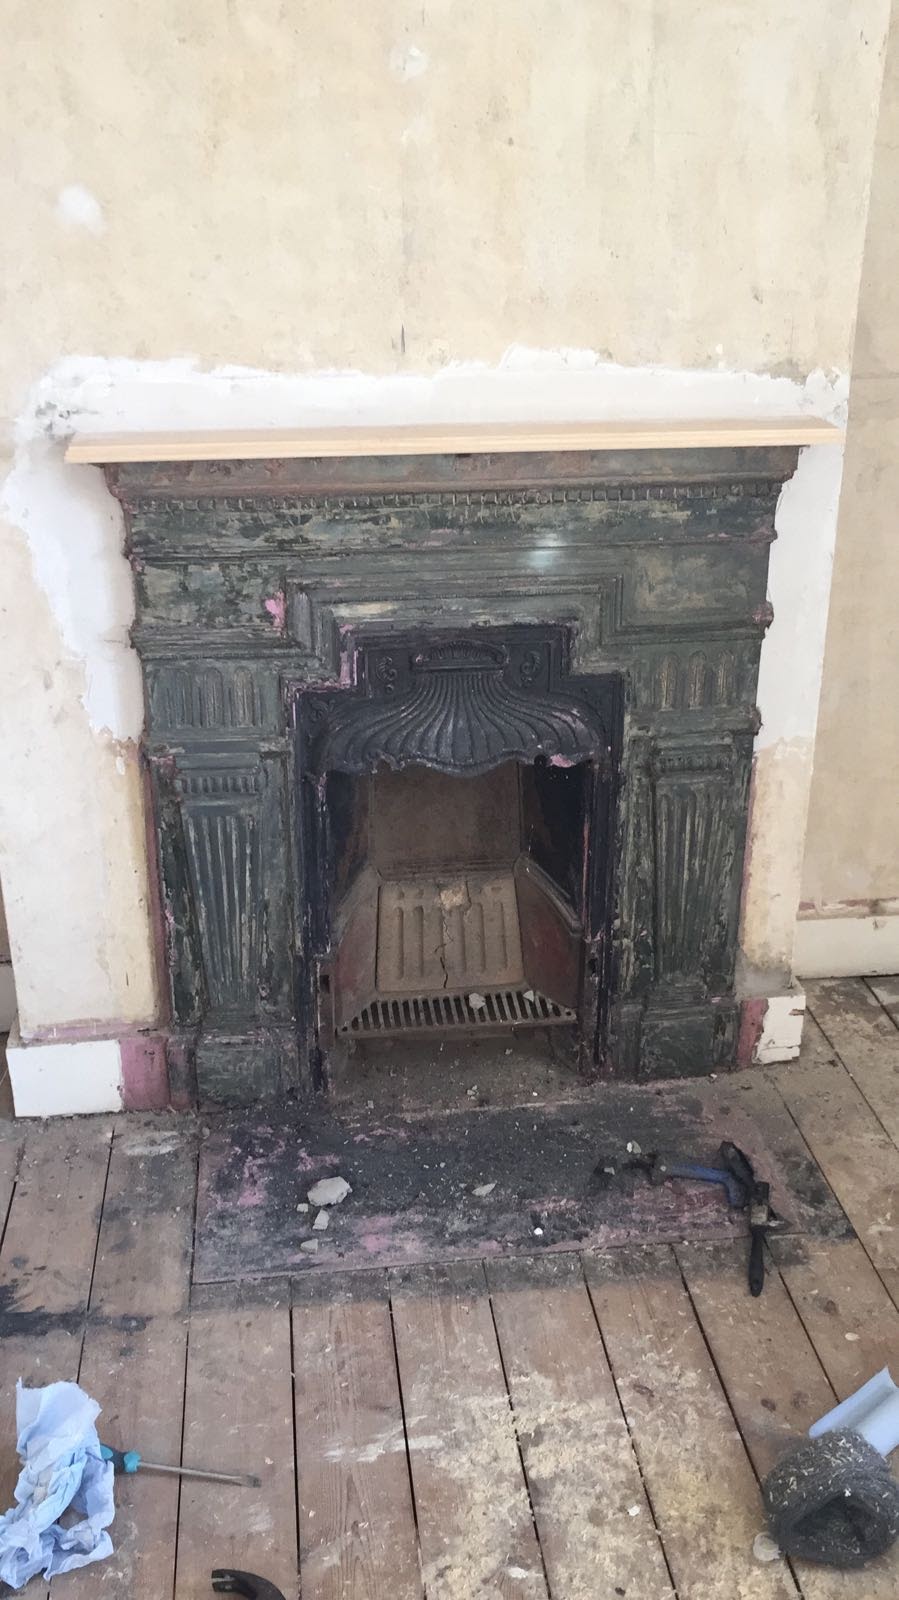
I set to work stripping the rest of the room, before focusing back on the fireplace.
I originally thought about painting it black, but I could tell that the many layers of paint were obscuring some of the detail. I read a few other blogs online and after seeing their finished fireplaces, I knew I needed to do this properly.
I used Nitramores paint stripper to remove the layers of paint, scraping off the top layers, then using more Nitramores and wire wool for the detailed bits.


We couldn't see these beautiful trees at all, the detail was totally obscured by paint layers.


Our mantel was sadly missing. I contacted some companies online but having a replacement made was well into hundreds of pounds, and simply out of our budget as there is so much work needed. Luckily this fireplace will only be decorative and will never be lit, so a handy family member Lee made us a wooden replacement.


With this in place, the room was really starting to take shape!


I didn't want to paint the fireplace and lose the beautiful detail under paint layers again, so I used grate polish, mixed with a small amount of white spirit. I applied this with a sponge, then used a rag to buff it to remove the excess and give a beautiful finish.


Before and After - what a difference! 


We just need to paint the mantel now, but will do this once the walls and ceiling have been painted. We will use a satin or eggshell black wood paint, to try and match the slight sheen of the grate polish (gloss would be too shiny).

Hiding in plain sight - original doors!

When we viewed, and when we first moved in, I was very aware of the state of the bedroom doors. They are horrible brown hollow doors, and one has a massive hole punched through it. They are definitely on our list of things to replace as soon as possible.


However, the downstairs doors downstairs didn't bother me too much - they are painted white, have a decorative beading round the edge, and seemed ok, at least for now.


Then, my parents visited, and they pointed out that these are actually panelled - it would have been blindingly obvious if I wasn't so focused on fixing the toilet and working out why the boiler keeps dripping.


After a boring day at work, and with the courage only gin can give, I decided I couldn't wait any longer - I dug out the hammer and a wallpaper scraper (in lieu of a chisel) and set to work.


I used the corner of the wallpaper scraper to carefully score through the (many) layers of paint, to find the edge of the panel. I then inserted the thin scraper and wiggled it a bit to make a gap before using the hammer as a lever. The pop as the panel pins came loose was very satisfying!


It was quite slow going initially as I was anxious not to damage the door underneath, and I was trying to pick up the pins straight away as I didn't want to step on them or scratch the floor.


I'm not sure whether to strip the doors or sand them lightly and repaint. They are not in perfect condition and would probably come apart if dipped. I am aware that I'll need to be careful doing this myself due to the likelihood of lead paint.


Monday 31 July 2017

Moving day

We moved in to our new house on Friday, and I'm pleased to say I already feels like home. It is an Edwardian red brick semi detached house, and it is beautiful but in dire need of some TLC.


The move itself went really well, and the removal firm we used were worth their weight in gold. We had move several times before, when renting and then into the flat we bought three years ago, and we had always done it ourselves with the help of friends and a hired van.
However, as we needed to be out of the flat by 1pm on completion day, I decided that we would pay a professional moving service, and I was amazed at how quickly they loaded the contents of the flat, loft and garden shed.


Luckily, despite my worries, we completed without a hitch and we able to collect the keys to our new house from the vendors - it is very close our old flat so it was a short journey.
The vendors had vacuumed, so we could move the furniture straight in, and we had help from family to clean the kitchen and bathroom before unpacking.


First priority was of course to find the kettle - moving is thirsty work!


As we will need to strip wallpaper, we put everything we didn't immediately need in the third bedroom, and set up our bed in the second bedroom. The master bedroom is in the worst condition, due to a leaking roof, so once the roof has been replaced, we will start our renovations in that room.


Once our lovely movers were finished, and more tea and biscuits had been consumed, we started really exploring our new home. There were lots of surprises we hadn't noticed when viewing (it is bizarre to think how little time you get to spend viewing what is likely the most expensive purchase of your life - I've spent more time dithering over a pair of boots!).


The end of the garden is very overgrown, and there is very dilapidated shed and another 20 foot of garden hidden behind the brambles. The ground seems very uneven and there may be the remains of an Anderson shelter under the mound at the end. There are also masses of blackberries, so I'll be making lots of crumble and maybe flavouring some gin.


The master bedroom has some boxing on the chimney breast, which was concealed behind a headboard when we viewed - I'm trying not to get to hopeful, but there might be an original fireplace behind it.


The ground floor doors are not the 70's horrors we thought - the original 4-panelled doors are hidden under sheets of MDF. I can't wait to carefully pry those off. The upstairs doors are hollow veneer unfortunately, but at least I can now try and match their replacements to the originals.


There's lots to do, and our most of budget is earmarked for the new roof, but I'm hoping it will be an interesting journey and a great learning experience.