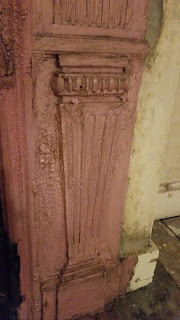
The day we moved in, we found an intriguing boxed in area on the master bedroom chimney breast, which had been hidden behind a headboard when we viewed the house. Ryan suggested we focus on unpacking first, but curiosity soon got the better of me, so I snuck upstairs and levered off the board.
I was really hoping to find an original fireplace, but I wasn't expecting it to be painted bright pink!
I set to work stripping the rest of the room, before focusing back on the fireplace.
I originally thought about painting it black, but I could tell that the many layers of paint were obscuring some of the detail. I read a few other blogs online and after seeing their finished fireplaces, I knew I needed to do this properly.
I used Nitramores paint stripper to remove the layers of paint, scraping off the top layers, then using more Nitramores and wire wool for the detailed bits.
We couldn't see these beautiful trees at all, the detail was totally obscured by paint layers.
Our mantel was sadly missing. I contacted some companies online but having a replacement made was well into hundreds of pounds, and simply out of our budget as there is so much work needed. Luckily this fireplace will only be decorative and will never be lit, so a handy family member Lee made us a wooden replacement.
With this in place, the room was really starting to take shape!
I didn't want to paint the fireplace and lose the beautiful detail under paint layers again, so I used grate polish, mixed with a small amount of white spirit. I applied this with a sponge, then used a rag to buff it to remove the excess and give a beautiful finish.
Before and After - what a difference!
We just need to paint the mantel now, but will do this once the walls and ceiling have been painted. We will use a satin or eggshell black wood paint, to try and match the slight sheen of the grate polish (gloss would be too shiny).


